
Setting up Google Apps for your domain is simple, and this short tutorial will show you how to integrate Google Apps for your domain.
Jump To Section
- Register With Google Apps
- Verify Domain Name
- Setup MX Records
- Setup Webmail Friendly URL
- Create User Accounts
- Conclusion
Register With Google Apps
You will first need to register the domain you wish to use with Google Apps.
As we step through this tutorial, we'll use cwhapps.com as our example domain. Replace this with your own domain name where appropriate.
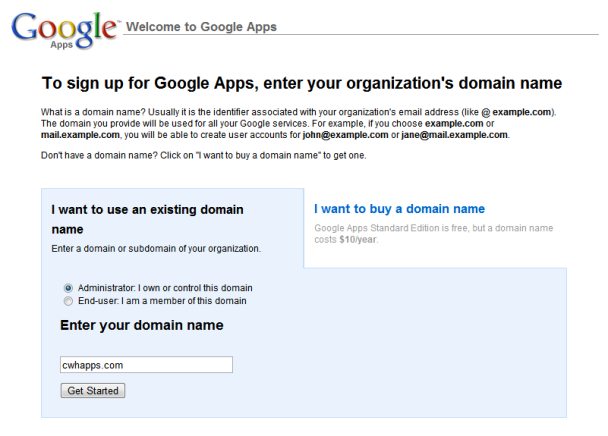
Start out by selecting Administrator: I own or control this domain on the default start screen and entering your domain name, e.g. chwapps.com. Click the Get Started button to continue.
The next page will have a form where you will need to establish your account. Simply follow the on-screen instructions and click Continue.
On the third step of the registration processes, the username you select will be an administrative account for the domain. It would be best to enter a username like admin, even if you won't be using this for email. Enter a password, read and agree to the terms and conditions, and click on the Continue with setup button.
Verify Domain Name
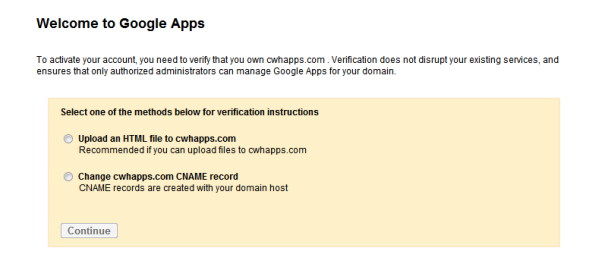
There's two different ways to verify your domain name so you can activate and use your Google Apps account:
- Upload an HTML file to your domain's
public_htmlfolder - Change the
CNAMErecord for your domain
The easiest and fastest way to activate your account is to upload a file, so we'll only cover that method.
Google will ask you to create a file called googlehostedservice.html. In this file, you will place a string of code. Copy that code to a file and upload it to your public_html folder.
This file should be visible when you try to access it via a web browser, e.g.:
http://www.cwhapps.com/googlehostedservice.htmlOnce you have uploaded this file on your website, click the I've completed the steps above button to continue. The verification process can take from a few minutes to a few hours.
With this method, there's no need to wait before we move on making the necessary MX record changes to our DNS zone file.
Setup MX Records
This step requires modifying your DNS zone file. This entire process can be done through cPanel.
Once you have logged in to cPanel, click on the MX Entry Editor icon. Select your domain from the dropdown list.
Under Email Routing, select the Remote Mail Exchanger option and click the Change button.
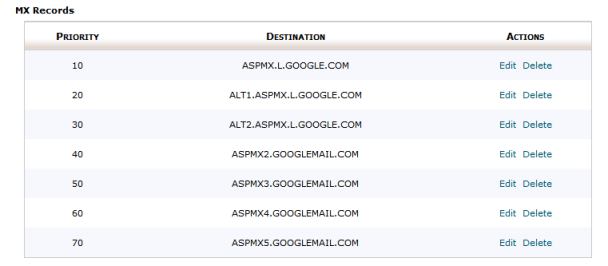
Under MX Records, you should only see one entry. Click the Edit link next to this record. For the Priority, set this to 10, and for the Destination, set this to ASPMX.L.GOOGLE.COM.
Once this record is in place, we're going to add six more MX records:
===============================================
PRIORITY        DESTINATION
===============================================
20            ALT1.ASPMX.L.GOOGLE.COM
30            ALT2.ASPMX.L.GOOGLE.COM
40            ASPMX2.GOOGLEMAIL.COM
50            ASPMX3.GOOGLEMAIL.COM
60            ASPMX4.GOOGLEMAIL.COM
70            ASPMX5.GOOGLEMAIL.COM
When you're done, it should look like this:
Now that we have setup our DNS zone file with the new MX records, we can activate the email service with Google Apps.
Back on the Dashboard screen of Google Apps, click the Activate email link in the Email section. The instructions here have already been completed above, so click the I have completed these steps button to continue.
It may take up to an hour or two for the Google Apps dashboard to show your email account as active, but for me, things start working rather immediately. You'll know it's ready when you see the word Active next to the Email icon and link.
Setup Webmail Friendly URL
Now that the DNS zone file is setup, we can configure our Google Apps email to listen for the CNAME we created above, so users can go to the following URL to access their mail:
http://mail.cwhapps.comIn the Google Apps window, we need to configure this for our email service. To edit this value, from the Google Apps navigation bar, click on Service Settings then Email.
http://mail.google.com/a/cwhapps.com…to our newly created CNAME address:
http://mail.cwhapps.comClick on Change URL link in the Web address section. Then, click on the custom option and enter mail into the text field. Click Continue to move on to the next step.
On the next page, go ahead and click the I've completed these steps button, because we'll set this up next.
Go back to cPanel, and click on the Advanced DNS Zone Editor icon.
You should already see an entry in your Zone File Records like this:
mail.cwhapps.com.Click the Edit link, and for the CNAME, enter ghs.google.com. Click the Edit Record button to save the record.
![]()
Create User Accounts
To setup your first account, click on the Create new users link from the dashboard of your Google Apps account. Follow the on-screen instructions to walk through the simple user setup and click Create New User to complete the user creation process.
Conclusion
Now you have a robust email service that's accessible via your favorite browser or phone, such as the iPhone and Android. Best of all, it's free!
In the settings of each user account, you will find instructions for setting up POP3 and IMAP access for all the popular email clients.
Take the time to become familiar with your Google Apps account and explore the advanced features, such as filters, labels, and remote mail server access (POP3 and IMAP) from your Google Apps account.
Email is just one part of Google Apps, and you should explore the other collaborative tools included with your new Google Apps account, including document sharing, calendar collaboration, and chat.
You're no longer limited to the confines of your hosting company's email package. Consider the Google Apps Email service a solution for your company's professional email needs.